Session Pitch

Turn Through Gates

Change direction into an open exit.

U830 / 45 / 60 minRecommended 6–10 playersVersion 2.0.0

A player reaches a boundary and turns into the same traffic. Practise braking and looking for a different exit.

Adapt for your team

Customize your session

Dimensions include a 2 m perimeter buffer. Confirm clear space and a usable surface before play.

30 minutes combines the application challenge with the game. Every length includes instructions, water and transitions.

Open coach timer

ZIP includes coach cards, maps, timeline, rotations and JSON. To save a PDF, choose Save as PDF in your browser print dialog.

Player arrivals and departures

Use anonymous numbers from 1 to 99. Changes take effect before an activity begins; each activity needs 4–16 players.

    Your practice

    Change direction into an open exit.

    U860 min6 starting players20 × 25 mField practice

    Bring 6 balls and 16 cones. Use ground play and line targets. Keep water available.

    Look for progress

    • Slow before turning rather than after the ball escapes.
    • Choose an exit that is clear when the turn begins.

    Check the surface, boundaries and equipment before play. Pause or simplify whenever needed. Confirm local youth football rules. Numbered slots replace names.

    1. 10:00–10:00Prepare the first decision
    2. 210:00–22:00Turn and return
    3. 322:00–25:00Water and reset
    4. 425:00–40:00Exit finder
    5. 540:00–55:00Use the choice in a game
    6. 655:00–60:00Recall one useful choice
    1

    Prepare the first decision

    10 min

    Players this activity: 1, 2, 3, 4, 5, 6 · 6 attending

    Begin at walking pace in the numbered stations. Walk toward a line, turn before crossing it and point to the space the ball will enter. Share the ball when needed; an observer watches the same decision and takes a ball turn on the next assigned round.

    Slow before the turn; accelerate into space. The braking touch precedes the change of direction.

    Run the activity

    1. Walk toward a line, turn before crossing it and point to the space the ball will enter.
    2. Pause on a raised hand and point to the space you chose.
    3. Swap the ball on the round signal and notice this feature: The braking touch precedes the change of direction.

    Play

    • Walk toward a line, turn before crossing it and point to the space the ball will enter.
    • Ground play only. No heading, sliding, body contact or tackles at a player's feet. Intercept loose ground passes only. Offer water or a pause whenever needed.

    Watch for

    The braking touch precedes the change of direction.

    If you see: A large touch carries the player over the line.

    Try: Start nearer the line and make the approach at walking pace.

    Organisation

    3 separate stations. Roles: carrier and receiver / shadow; extra players observe. Advance one slot each round. 2 turns cover every player. A first carrier turn can take up to 60s of activity. Waiting is active observation; add balls or reduce group size if it becomes too long.

    7 rounds × 60 seconds. Timing: 420s activity · 60s briefing · 60s rest · 60s transition.

    Adjust the challenge

    Easier: Practise one inside turn from a stationary ball.

    Next step: Choose a different turning foot on the return journey.

    Move on: Stop the balls and identify the start positions for turn and return.
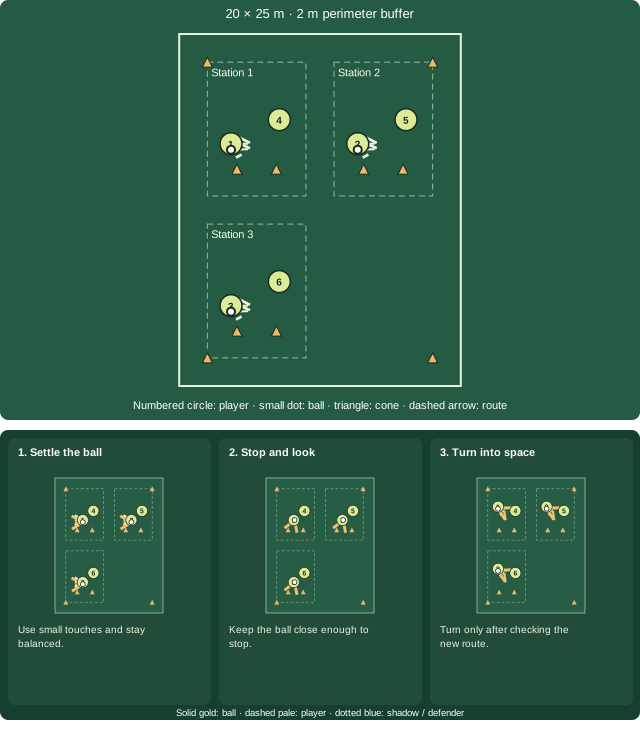
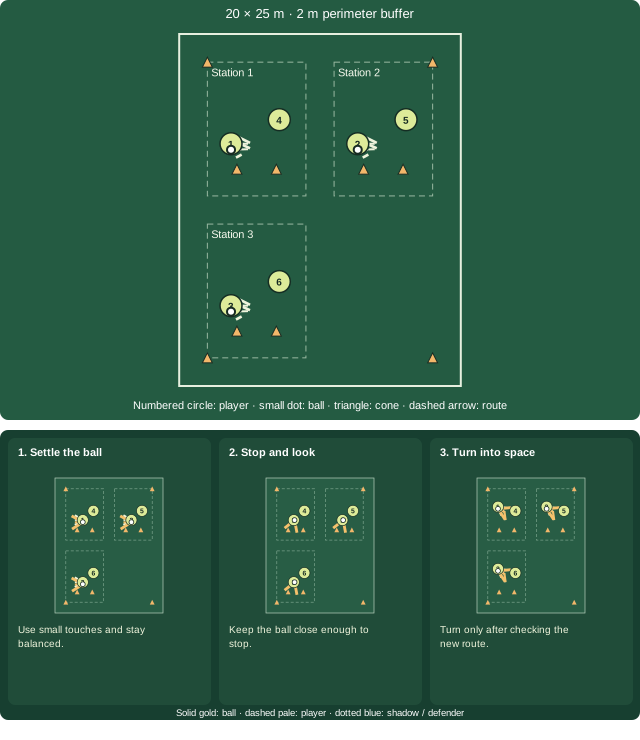
    20 × 25 m clear area with a 2 m perimeter buffer. 3 numbered stations, 6 numbered player slots, 3 balls and 10 cones. Each station shares one ball and rotates roles; dashed arrow shows an example travel or pass route. Focus: Change direction into an open exit. Diagram shows starting positions, not fixed player locations. Three steps show stop turn using the first round's numbered players. Solid gold routes show the ball; dashed pale routes show player movement; dotted blue routes show a shadow or defender. Routes stay inside each numbered station. 1. Settle the ball: Use small touches and stay balanced. 2. Stop and look: Keep the ball close enough to stop. 3. Turn into space: Turn only after checking the new route.

    20 × 25 m clear area with a 2 m perimeter buffer. 3 numbered stations, 6 numbered player slots, 3 balls and 10 cones. Each station shares one ball and rotates roles; dashed arrow shows an example travel or pass route. Focus: Change direction into an open exit. Diagram shows starting positions, not fixed player locations. Three steps show stop turn using the first round's numbered players. Solid gold routes show the ball; dashed pale routes show player movement; dotted blue routes show a shadow or defender. Routes stay inside each numbered station. 1. Settle the ball: Use small touches and stay balanced. 2. Stop and look: Keep the ball close enough to stop. 3. Turn into space: Turn only after checking the new route.

    Round-by-round player roles
    RoundAssignments
    1 · 60s1: carrier (station 1); 4: receiver / shadow (station 1); 2: carrier (station 2); 5: receiver / shadow (station 2); 3: carrier (station 3); 6: receiver / shadow (station 3)
    2 · 60s1: receiver / shadow (station 1); 4: carrier (station 1); 2: receiver / shadow (station 2); 5: carrier (station 2); 3: receiver / shadow (station 3); 6: carrier (station 3)
    3 · 60s1: carrier (station 1); 4: receiver / shadow (station 1); 2: carrier (station 2); 5: receiver / shadow (station 2); 3: carrier (station 3); 6: receiver / shadow (station 3)
    4 · 60s1: receiver / shadow (station 1); 4: carrier (station 1); 2: receiver / shadow (station 2); 5: carrier (station 2); 3: receiver / shadow (station 3); 6: carrier (station 3)
    5 · 60s1: carrier (station 1); 4: receiver / shadow (station 1); 2: carrier (station 2); 5: receiver / shadow (station 2); 3: carrier (station 3); 6: receiver / shadow (station 3)
    6 · 60s1: receiver / shadow (station 1); 4: carrier (station 1); 2: receiver / shadow (station 2); 5: carrier (station 2); 3: receiver / shadow (station 3); 6: carrier (station 3)
    7 · 60s1: carrier (station 1); 4: receiver / shadow (station 1); 2: carrier (station 2); 5: receiver / shadow (station 2); 3: carrier (station 3); 6: receiver / shadow (station 3)
    Download map SVG

    Equipment: 3 balls · 10 cones · 0 goals

    2

    Turn and return

    12 min

    Players this activity: 1, 2, 3, 4, 5, 6 · 6 attending

    Pairs share a lane with a turning line at each end. The partner observes from outside the travel path.

    Slow before the turn; accelerate into space. The braking touch precedes the change of direction.

    Run the activity

    1. Approach a line with short touches.
    2. Use the inside, outside or sole to turn back inside the lane.
    3. Compare which turn kept the ball closest, then exchange the ball.

    Play

    • Approach a line with short touches.
    • Ground play only. No heading, sliding, body contact or tackles at a player's feet. Intercept loose ground passes only. Offer water or a pause whenever needed.

    Watch for

    The braking touch precedes the change of direction.

    If you see: A large touch carries the player over the line.

    Try: Start nearer the line and make the approach at walking pace.

    Organisation

    3 separate stations. Roles: carrier and receiver / shadow; extra players observe. Advance one slot each round. 2 turns cover every player. A first carrier turn can take up to 60s of activity. Waiting is active observation; add balls or reduce group size if it becomes too long.

    10 rounds × 60 seconds. Timing: 600s activity · 60s briefing · 30s rest · 30s transition.

    Adjust the challenge

    Easier: Practise one inside turn from a stationary ball.

    Next step: Choose a different turning foot on the return journey.

    Move on: Stop in place, recall the braking touch precedes the change of direction. and walk to water with the balls still.

    20 × 25 m clear area with a 2 m perimeter buffer. 3 numbered stations, 6 numbered player slots, 3 balls and 10 cones. Each station shares one ball and rotates roles; dashed arrow shows an example travel or pass route. Focus: Change direction into an open exit. Diagram shows starting positions, not fixed player locations. Three steps show stop turn using the first round's numbered players. Solid gold routes show the ball; dashed pale routes show player movement; dotted blue routes show a shadow or defender. Routes stay inside each numbered station. 1. Settle the ball: Use small touches and stay balanced. 2. Stop and look: Keep the ball close enough to stop. 3. Turn into space: Turn only after checking the new route.

    20 × 25 m clear area with a 2 m perimeter buffer. 3 numbered stations, 6 numbered player slots, 3 balls and 10 cones. Each station shares one ball and rotates roles; dashed arrow shows an example travel or pass route. Focus: Change direction into an open exit. Diagram shows starting positions, not fixed player locations. Three steps show stop turn using the first round's numbered players. Solid gold routes show the ball; dashed pale routes show player movement; dotted blue routes show a shadow or defender. Routes stay inside each numbered station. 1. Settle the ball: Use small touches and stay balanced. 2. Stop and look: Keep the ball close enough to stop. 3. Turn into space: Turn only after checking the new route.

    Round-by-round player roles
    RoundAssignments
    1 · 60s1: carrier (station 1); 4: receiver / shadow (station 1); 2: carrier (station 2); 5: receiver / shadow (station 2); 3: carrier (station 3); 6: receiver / shadow (station 3)
    2 · 60s1: receiver / shadow (station 1); 4: carrier (station 1); 2: receiver / shadow (station 2); 5: carrier (station 2); 3: receiver / shadow (station 3); 6: carrier (station 3)
    3 · 60s1: carrier (station 1); 4: receiver / shadow (station 1); 2: carrier (station 2); 5: receiver / shadow (station 2); 3: carrier (station 3); 6: receiver / shadow (station 3)
    4 · 60s1: receiver / shadow (station 1); 4: carrier (station 1); 2: receiver / shadow (station 2); 5: carrier (station 2); 3: receiver / shadow (station 3); 6: carrier (station 3)
    5 · 60s1: carrier (station 1); 4: receiver / shadow (station 1); 2: carrier (station 2); 5: receiver / shadow (station 2); 3: carrier (station 3); 6: receiver / shadow (station 3)
    6 · 60s1: receiver / shadow (station 1); 4: carrier (station 1); 2: receiver / shadow (station 2); 5: carrier (station 2); 3: receiver / shadow (station 3); 6: carrier (station 3)
    7 · 60s1: carrier (station 1); 4: receiver / shadow (station 1); 2: carrier (station 2); 5: receiver / shadow (station 2); 3: carrier (station 3); 6: receiver / shadow (station 3)
    8 · 60s1: receiver / shadow (station 1); 4: carrier (station 1); 2: receiver / shadow (station 2); 5: carrier (station 2); 3: receiver / shadow (station 3); 6: carrier (station 3)
    9 · 60s1: carrier (station 1); 4: receiver / shadow (station 1); 2: carrier (station 2); 5: receiver / shadow (station 2); 3: carrier (station 3); 6: receiver / shadow (station 3)
    10 · 60s1: receiver / shadow (station 1); 4: carrier (station 1); 2: receiver / shadow (station 2); 5: carrier (station 2); 3: receiver / shadow (station 3); 6: carrier (station 3)
    Download map SVG

    Equipment: 3 balls · 10 cones · 0 goals

    3

    Water and reset

    3 min

    Players this activity: 1, 2, 3, 4, 5, 6 · 6 attending

    Offer water and rest. Leave balls still outside the walking route. Before restarting, show the next decision: The eyes leave the ball before the turn.

    Slow before the turn; accelerate into space. Every player has a rest opportunity and understands the next start position.

    Run the activity

    1. Stop every ball and offer water or seated rest.
    2. Check the surface, clear the next station and keep boundary buffers empty.
    3. Name what to look for next: The eyes leave the ball before the turn.

    Play

    • Stop every ball and offer water or seated rest.
    • Ground play only. No heading, sliding, body contact or tackles at a player's feet. Intercept loose ground passes only. Offer water or a pause whenever needed.

    Watch for

    Every player has a rest opportunity and understands the next start position.

    If you see: Players begin moving balls while others cross the area.

    Try: Keep every ball still until the area is clear and all players have heard the start signal.

    Organisation

    All players rest or reflect together.

    Timing: 0s activity · 30s briefing · 120s rest · 30s transition.

    Adjust the challenge

    Easier: Demonstrate only the first action, then begin slowly.

    Next step: Invite a player to point out the next receiving or observation position.

    Move on: Show the first decision in exit finder before the restart signal.

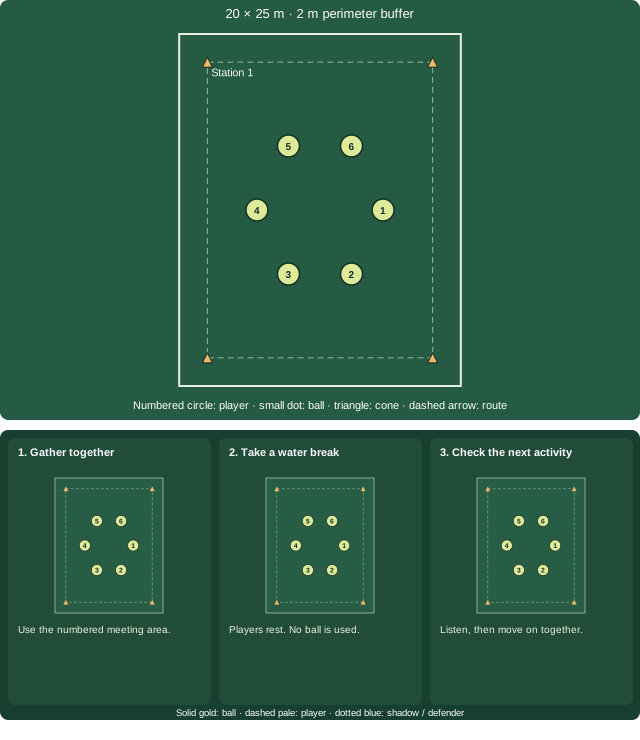
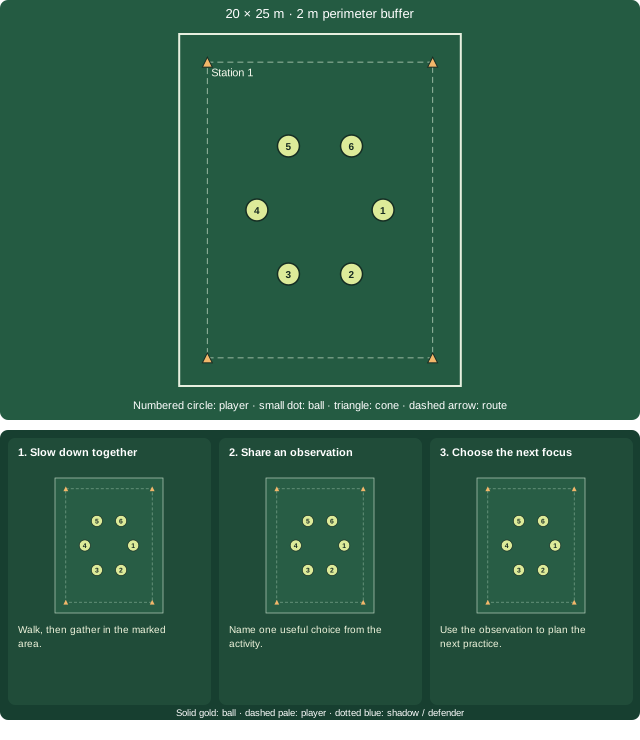
    20 × 25 m clear area with a 2 m perimeter buffer. 1 numbered stations, 6 numbered player slots, 0 balls and 4 cones. Players gather for rest or reflection; no ball is used. Focus: Change direction into an open exit. Diagram shows starting positions, not fixed player locations.

    20 × 25 m clear area with a 2 m perimeter buffer. 1 numbered stations, 6 numbered player slots, 0 balls and 4 cones. Players gather for rest or reflection; no ball is used. Focus: Change direction into an open exit. Diagram shows starting positions, not fixed player locations.

    Round-by-round player roles
    RoundAssignments
    Rest1: rest / reflect (station 1); 2: rest / reflect (station 1); 3: rest / reflect (station 1); 4: rest / reflect (station 1); 5: rest / reflect (station 1); 6: rest / reflect (station 1)
    Download map SVG

    Equipment: 0 balls · 4 cones · 0 goals

    4

    Exit finder

    15 min

    Players this activity: 1, 2, 3, 4, 5, 6 · 6 attending

    Name left and right exits at the far end of a station. A partner signals which exit is closed.

    Slow before the turn; accelerate into space. The eyes leave the ball before the turn.

    Run the activity

    1. Travel into the middle and look up before the final approach touch.
    2. Turn toward the exit that remains open.
    3. Stop after leaving the central area and tell the partner what you saw.

    Play

    • Travel into the middle and look up before the final approach touch.
    • Ground play only. No heading, sliding, body contact or tackles at a player's feet. Intercept loose ground passes only. Offer water or a pause whenever needed.

    Watch for

    The eyes leave the ball before the turn.

    If you see: The turn begins toward the signalled closed side.

    Try: Ask the player to say the open side before touching the ball.

    Organisation

    3 separate stations. Roles: carrier and receiver / shadow; extra players observe. Advance one slot each round. 2 turns cover every player. A first carrier turn can take up to 60s of activity. Waiting is active observation; add balls or reduce group size if it becomes too long.

    12 rounds × 60 seconds. Timing: 720s activity · 60s briefing · 90s rest · 30s transition.

    Adjust the challenge

    Easier: Announce the open side while the ball is still.

    Next step: Signal once during the approach instead of before it.

    Move on: Stop the station balls, show the game target lines and explain this condition: Score through either side exit after a controlled turn.

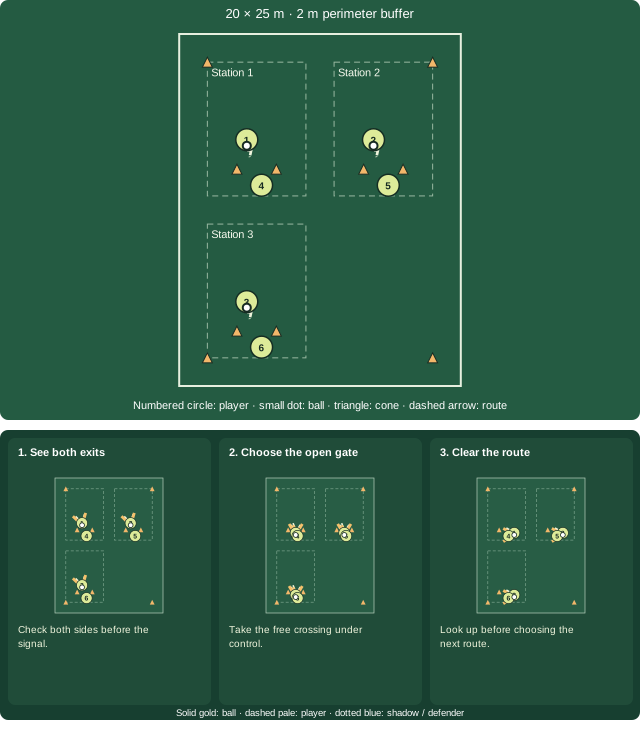
    20 × 25 m clear area with a 2 m perimeter buffer. 3 numbered stations, 6 numbered player slots, 3 balls and 10 cones. Each station shares one ball and rotates roles; dashed arrow shows an example travel or pass route. Focus: Change direction into an open exit. Diagram shows starting positions, not fixed player locations. Three steps show gate escape using the first round's numbered players. Solid gold routes show the ball; dashed pale routes show player movement; dotted blue routes show a shadow or defender. Routes stay inside each numbered station. 1. See both exits: Check both sides before the signal. 2. Choose the open gate: Take the free crossing under control. 3. Clear the route: Look up before choosing the next route.

    20 × 25 m clear area with a 2 m perimeter buffer. 3 numbered stations, 6 numbered player slots, 3 balls and 10 cones. Each station shares one ball and rotates roles; dashed arrow shows an example travel or pass route. Focus: Change direction into an open exit. Diagram shows starting positions, not fixed player locations. Three steps show gate escape using the first round's numbered players. Solid gold routes show the ball; dashed pale routes show player movement; dotted blue routes show a shadow or defender. Routes stay inside each numbered station. 1. See both exits: Check both sides before the signal. 2. Choose the open gate: Take the free crossing under control. 3. Clear the route: Look up before choosing the next route.

    Round-by-round player roles
    RoundAssignments
    1 · 60s1: carrier (station 1); 4: receiver / shadow (station 1); 2: carrier (station 2); 5: receiver / shadow (station 2); 3: carrier (station 3); 6: receiver / shadow (station 3)
    2 · 60s1: receiver / shadow (station 1); 4: carrier (station 1); 2: receiver / shadow (station 2); 5: carrier (station 2); 3: receiver / shadow (station 3); 6: carrier (station 3)
    3 · 60s1: carrier (station 1); 4: receiver / shadow (station 1); 2: carrier (station 2); 5: receiver / shadow (station 2); 3: carrier (station 3); 6: receiver / shadow (station 3)
    4 · 60s1: receiver / shadow (station 1); 4: carrier (station 1); 2: receiver / shadow (station 2); 5: carrier (station 2); 3: receiver / shadow (station 3); 6: carrier (station 3)
    5 · 60s1: carrier (station 1); 4: receiver / shadow (station 1); 2: carrier (station 2); 5: receiver / shadow (station 2); 3: carrier (station 3); 6: receiver / shadow (station 3)
    6 · 60s1: receiver / shadow (station 1); 4: carrier (station 1); 2: receiver / shadow (station 2); 5: carrier (station 2); 3: receiver / shadow (station 3); 6: carrier (station 3)
    7 · 60s1: carrier (station 1); 4: receiver / shadow (station 1); 2: carrier (station 2); 5: receiver / shadow (station 2); 3: carrier (station 3); 6: receiver / shadow (station 3)
    8 · 60s1: receiver / shadow (station 1); 4: carrier (station 1); 2: receiver / shadow (station 2); 5: carrier (station 2); 3: receiver / shadow (station 3); 6: carrier (station 3)
    9 · 60s1: carrier (station 1); 4: receiver / shadow (station 1); 2: carrier (station 2); 5: receiver / shadow (station 2); 3: carrier (station 3); 6: receiver / shadow (station 3)
    10 · 60s1: receiver / shadow (station 1); 4: carrier (station 1); 2: receiver / shadow (station 2); 5: carrier (station 2); 3: receiver / shadow (station 3); 6: carrier (station 3)
    11 · 60s1: carrier (station 1); 4: receiver / shadow (station 1); 2: carrier (station 2); 5: receiver / shadow (station 2); 3: carrier (station 3); 6: receiver / shadow (station 3)
    12 · 60s1: receiver / shadow (station 1); 4: carrier (station 1); 2: receiver / shadow (station 2); 5: carrier (station 2); 3: receiver / shadow (station 3); 6: carrier (station 3)
    Download map SVG

    Equipment: 3 balls · 10 cones · 0 goals

    5

    Use the choice in a game

    15 min

    Players this activity: 1, 2, 3, 4, 5, 6 · 6 attending

    Score through either side exit after a controlled turn. Use the numbered teams and neutral roles for this pitch. Agree line targets inside the shown area. Restart with a gentle ground pass; opponents retreat at least two metres until the first touch.

    Slow before the turn; accelerate into space. Count a turn that changes the route before a defender can close the space.

    Run the activity

    1. Before each round, explain the scoring condition: Score through either side exit after a controlled turn.
    2. Play within the marked pitch using the current numbered roles; restart from the nearest boundary after the ball leaves.
    3. At the next pause, give one observed example: Count a turn that changes the route before a defender can close the space.

    Play

    • Before each round, explain the scoring condition: Score through either side exit after a controlled turn.
    • Ground play only. No heading, sliding, body contact or tackles at a player's feet. Intercept loose ground passes only. Offer water or a pause whenever needed.

    Watch for

    Count a turn that changes the route before a defender can close the space.

    If you see: The turn begins toward the signalled closed side.

    Try: Ask the player to say the open side before touching the ball.

    Organisation

    1 pitch. Teams use numbered A/B slots. Odd groups use a neutral who helps the team with the ball. Rotate slot assignments between rounds; everyone plays and each odd-pitch player takes a neutral turn.

    4 rounds × 180 seconds. Timing: 720s activity · 60s briefing · 90s rest · 30s transition.

    Adjust the challenge

    Easier: Pause at each restart to show the available choice. Announce the open side while the ball is still.

    Next step: Signal once during the approach instead of before it.

    Move on: Stop every ball, bring the numbered groups together and leave a clear space for walking or seated reflection.

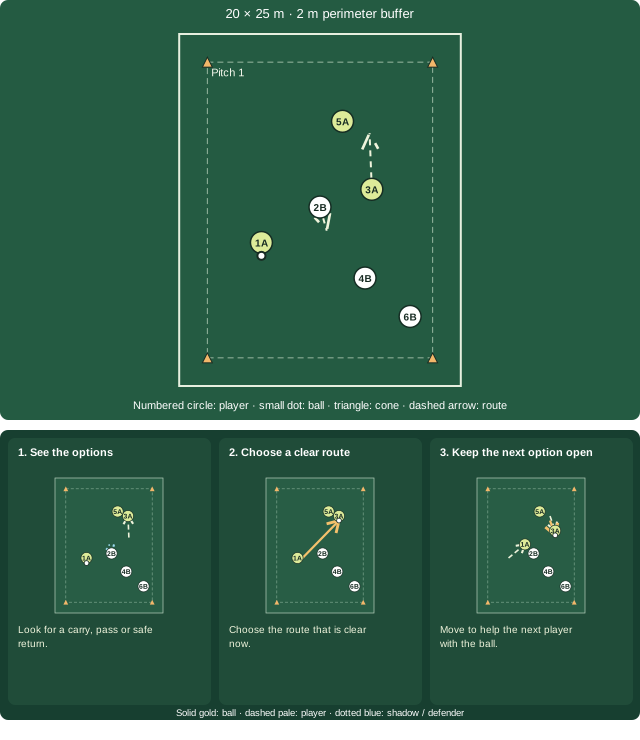
    20 × 25 m clear area with a 2 m perimeter buffer. 1 numbered pitches, 6 numbered player slots, 1 balls and 4 cones. A and B are teams; N is the supporting neutral. End lines are scoring targets. Focus: Change direction into an open exit. Diagram shows starting positions, not fixed player locations. Three steps show decision game using the first round's numbered players. Solid gold routes show the ball; dashed pale routes show player movement; dotted blue routes show a shadow or defender. Routes stay inside each numbered station. 1. See the options: Look for a carry, pass or safe return. 2. Choose a clear route: Choose the route that is clear now. 3. Keep the next option open: Move to help the next player with the ball.

    20 × 25 m clear area with a 2 m perimeter buffer. 1 numbered pitches, 6 numbered player slots, 1 balls and 4 cones. A and B are teams; N is the supporting neutral. End lines are scoring targets. Focus: Change direction into an open exit. Diagram shows starting positions, not fixed player locations. Three steps show decision game using the first round's numbered players. Solid gold routes show the ball; dashed pale routes show player movement; dotted blue routes show a shadow or defender. Routes stay inside each numbered station. 1. See the options: Look for a carry, pass or safe return. 2. Choose a clear route: Choose the route that is clear now. 3. Keep the next option open: Move to help the next player with the ball.

    Round-by-round player roles
    RoundAssignments
    1 · 180s1: team A (station 1); 2: team B (station 1); 3: team A (station 1); 4: team B (station 1); 5: team A (station 1); 6: team B (station 1)
    2 · 180s1: team B (station 1); 2: team A (station 1); 3: team B (station 1); 4: team A (station 1); 5: team B (station 1); 6: team A (station 1)
    3 · 180s1: team A (station 1); 2: team B (station 1); 3: team A (station 1); 4: team B (station 1); 5: team A (station 1); 6: team B (station 1)
    4 · 180s1: team B (station 1); 2: team A (station 1); 3: team B (station 1); 4: team A (station 1); 5: team B (station 1); 6: team A (station 1)
    Download map SVG

    Equipment: 1 balls · 4 cones · 0 goals

    6

    Recall one useful choice

    5 min

    Players this activity: 1, 2, 3, 4, 5, 6 · 6 attending

    Leave the balls still and walk comfortably within your own station. Recall one choice from the session, then ask: When did you see the new exit?

    Slow before the turn; accelerate into space. Slow before turning rather than after the ball escapes. Choose an exit that is clear when the turn begins.

    Run the activity

    1. Leave all balls still; choose comfortable walking or seated rest.
    2. Point to the movement you remember without a ball, then reflect: When did you see the new exit?
    3. Share one observed example or say that you need another look; count the players and equipment before finishing.

    Play

    • Leave all balls still; choose comfortable walking or seated rest.
    • Ground play only. No heading, sliding, body contact or tackles at a player's feet. Intercept loose ground passes only. Offer water or a pause whenever needed.

    Watch for

    Slow before turning rather than after the ball escapes. Choose an exit that is clear when the turn begins.

    If you see: The review names only the score and misses the choice that led to it.

    Try: Ask for one specific example: Count a turn that changes the route before a defender can close the space.

    Organisation

    All players rest or reflect together.

    2 rounds × 60 seconds. Timing: 120s activity · 60s briefing · 90s rest · 30s transition.

    Adjust the challenge

    Easier: Allow a pointing gesture or one word instead of a spoken explanation.

    Next step: Invite a player to explain what they would change if the same route closed next time.

    Move on: Check every player and collect stationary equipment before leaving the area.

    20 × 25 m clear area with a 2 m perimeter buffer. 1 numbered stations, 6 numbered player slots, 0 balls and 4 cones. Players gather for rest or reflection; no ball is used. Focus: Change direction into an open exit. Diagram shows starting positions, not fixed player locations.

    20 × 25 m clear area with a 2 m perimeter buffer. 1 numbered stations, 6 numbered player slots, 0 balls and 4 cones. Players gather for rest or reflection; no ball is used. Focus: Change direction into an open exit. Diagram shows starting positions, not fixed player locations.

    Round-by-round player roles
    RoundAssignments
    1 · 60s1: rest / reflect (station 1); 2: rest / reflect (station 1); 3: rest / reflect (station 1); 4: rest / reflect (station 1); 5: rest / reflect (station 1); 6: rest / reflect (station 1)
    2 · 60s1: rest / reflect (station 1); 2: rest / reflect (station 1); 3: rest / reflect (station 1); 4: rest / reflect (station 1); 5: rest / reflect (station 1); 6: rest / reflect (station 1)
    Download map SVG

    Equipment: 0 balls · 4 cones · 0 goals

    After the practice

    When did you see the new exit?

    Choose an observation and find your next practice

    Related practices

    Dribble and StopBoundary BrakesProtect Your Ball